5.1. Full Documentation: Project Directory Structure and Matlab Configuration
This section provides the same instructions as the quick-start set up in section 4.1, but in much greater detail.
On this page:
- Setting up your project directory structure and configure Matlab to work with Biomet.net
- Configure Matlab for directory structure
Setting up your project directory structure and configure Matlab to work with Biomet.net
Each user should have at least one Project directory which encompasses data cleaning/analysis/research for a group of similar flux sites, e.g., FLUXNET-Canada-V2.0. You will need the full file path to this Project directory, and also you will need to create a site IDs(s) for your flux site(s), if they do not already exist. Site IDs are usually acronyms based on the site name.
Important notes:
We enforce using uppercase for site IDs, to avoid problems with running data cleaning on Mac vs. Windows. Examples: the Delta Salt Marsh site ID is
DSM; the Turkey Point Agriculture site ID isTPAG.Site IDs must also be a valid Matlab variable name: they should start with a letter, can only be alphanumeric, and are allowed to contain underscores but no other special characters (no hyphens!), e.g.,
PE_TNR.Your project directory must be on your local computer: avoid putting it on an external drive or cloud drive (like OneDrive or GDrive) as this will cause problems in the steps that follow. Additionally, avoid putting it in the Biomet.net directory.
Your
<projectPath>, which you will need when following the instructions, is the full filepath to yourProjectroot directory. E.g., if your project is calledMy_Micromet, the project path would be similar to/Users/<username>/Projects/My_Micromet/.
We provide functions within the Biomet library to help you set up the project directory structure and configure Matlab:
Instructions (steps match those in section 4.1)
If you have multiple flux sites, choose one site to begin working with. Using the Matlab command line, define your projectPath and siteID as in the following example:
For example, if the name of your project is
My_Micromet, and your chosen siteID isSITEID1, you would enter the following commands in the Matlab command window:Mac example:
 projectPath = '/Users/<username>/Projects/My_Micromet/';
 siteID = 'SITEID1';
PC example:
 projectPath = 'C:\Projects\My_Micromet\';
 siteID = 'SITEID1';
Next, in Matlab, run the
create_TAB_ProjectFoldersfunction (which is in theBiomet.netlibrary that you cloned or downloaded), as follows:create_TAB_ProjectFolders(projectPath,siteID)
Both input arguments are of type “string”. You can use single
''or double""quotation marks for these purposes in Matlab, although technically, these mean slightly different things; see this link for more info.
Instructions continue below (Configure Matlab for directory structure) following these details on the create_TAB_ProjectFolders function, which takes care of several steps for you, outlined next:
In your
Projectroot directory (My_Micrometin figure 5.1A), you should now see three directories with the following names: (1) Database, (2) Matlab, (3) Sites. In this directory tree example, there are three project root directories to illustrate the structure in case you have more than one project: My_Micromet (highlighted in green), CH4_V2.0, and FLUXNET-Canada-V2.0; although you may only have one.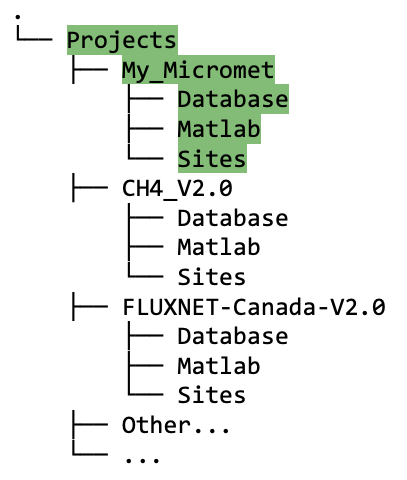
Figure 5.1A Directory tree showing contents of
My_Micrometproject folder after running thecreate_TAB_ProjectFoldersMatlab function; also shown is the structure if there are multiple projects, e.g., My_Micromet, CH4_V2.0, FLUXNET-Canada-V2.0.
If you do not see these contents, and/or Matlab gives you an error on running create_TAB_ProjectFolders, you should check which version of Matlab you are using. If you are working with an earlier version of Matlab than 2023b, this is likely the cause of the issue. In this case, download this zip file, unzip, and put the contents of “My_Micromet_Folder” within your project directory (underneath My_Micromet); then make sure your directory structure looks like figure 4.1.
NOTE: The directory information given next is simply descriptions of the contents of these folders and their purpose. The next instructions to follow are below under “Configure Matlab for Directory Structure”.
Database directory
Within the new Database directory that you just made, you will find another new directory called Calculation_Procedures, and within Calculation_Procedures, there should be two subdirectories: AmeriFlux and TraceAnalysis_ini. Eventually your initial database and cleaned data will go here (instructions are in future sections).
In the
Amerifluxfolder, thecreate_TAB_ProjectFolders.mfunction has cloned a git repository containing necessary files (figure 5.1B, highlighted in blue) that will be needed later if you want to convert your cleaned data into AmeriFlux format.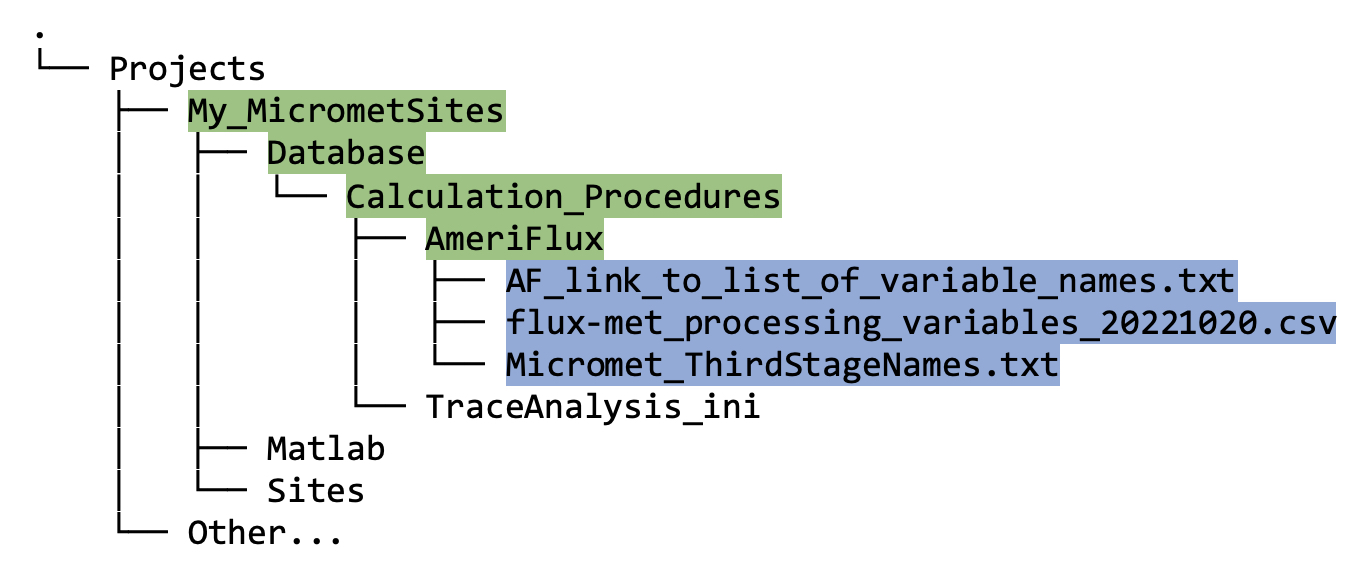
Figure 5.1B. Directory tree showing contents of
AmeriFluxdirectory after running thecreate_TAB_ProjectFoldersMatlab function.Within
TraceAnalysis_ini, you will see a subdirectory named using your SITEID (SITEID1in this example, figure 5.1C), as follows: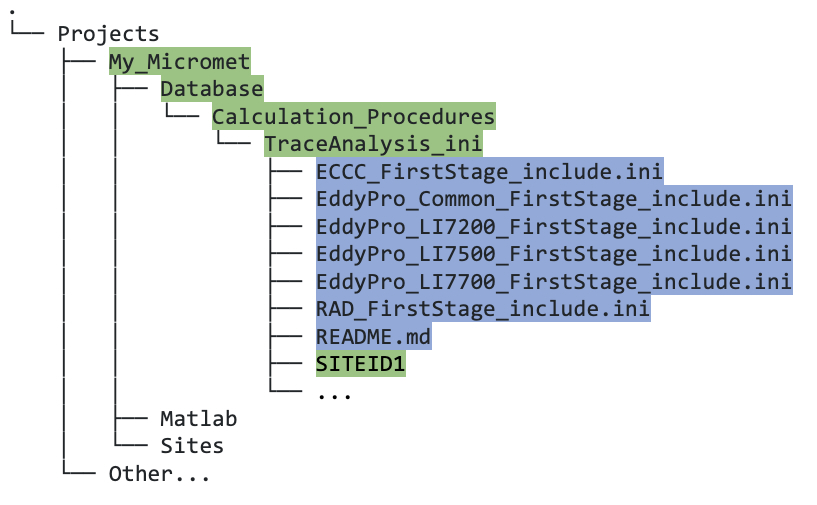
Figure 5.1C. Directory tree showing contents of
TraceAnalysis_inidirectory after running thecreate_TAB_ProjectFoldersMatlab function.Now, if you navigate to that
SITEID1directory, you should see two more folders:Derived_Variablesandlog(figure 5.1D). Your site-specific INI files will eventually go into thisSITEID1directory.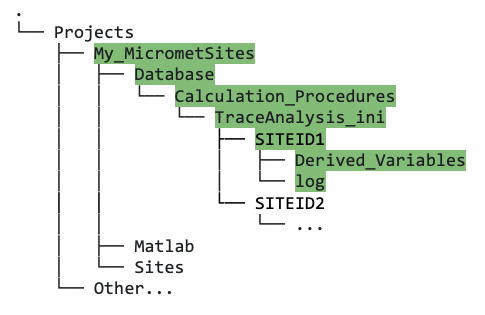
Figure 5.1D. Directory tree showing contents of
SITEID1directory withinTraceAnalysis_ini, after running thecreate_TAB_ProjectFoldersMatlab function.Within the
TraceAnalysis_inifolder, you should also find a series of “include” files (that were cloned by thecreate_TAB_ProjectFoldersfunction; figure 5.1C); these are important, and their purpose is described in detail in section 5.3.
Sites directory
Raw, uncleaned data from your site(s) will be stored in the
<projectPath>/Sitesdirectory (Figure 5.1E), under the appropriate siteID. The data in this directory should remain untouched since we always want to preserve a copy of the raw data.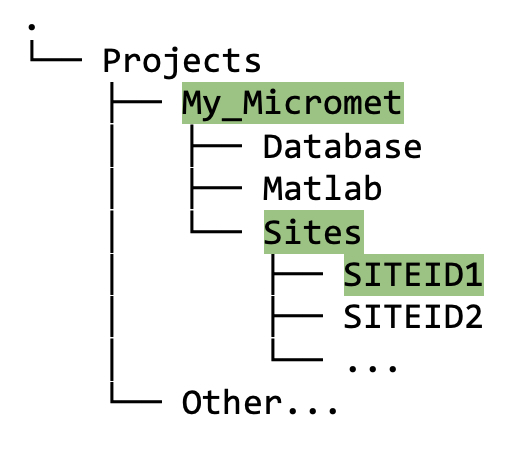
Figure 5.1E. Directory tree showing contents of
Sitesfolder after running thecreate_TAB_ProjectFoldersMatlab function.
Matlab directory
- This directory should now contain three matlab files:
-
get_TAB_project_configuration.mwhich was created “behind the scenes” in step 2 above; -
biomet_database_default.m; and -
biomet_sites_default.m.
-
The latter two functions are used in the pipeline behind the scenes and may also be useful to you later when you want to visualize your data.
Once you have confirmed all files and folders appear as described above, you can now move on to the next step which configures Matlab for the directory structure you just created.
Configure Matlab for directory structure
Instructions
- (Step 3 in quick-start guide; section 4.1) Run
set_TAB_project(projectPath)
This process sets up the Biomet.net toolbox to work with your project.
If you wish to, you can add the name of your project, for documentation purposes only, to the new file get_TAB_project_configuration.m which was created when running set_TAB_project(projectPath) in step 3.
Optional final step: open (but do not run)
get_TAB_project_configuration.m, located in/<projectPath>/Matlab/and enter your projectName (user-preferred name, this is just for documentation purposes and not used for processing). The file should look like this:function structProject = get_TAB_project_configuration (projectPath) projectName = 'My_Micromet project is the best'; structProject.projectName = projectName; structProject.path = fullfile(projectPath); structProject.databasePath = fullfile(structProject.path,'Database'); structProject.sitesPath = fullfile(structProject.path,'Sites'); structProject.matlabPath = fullfile(structProject.path,'Matlab');[In case you do not have this script, you can simply copy this code and edit the string assigned to
projectName.]Matlab is now ready to run data processing and cleaning for that particular project.
At this point, your Matlab directory should contain the following files:
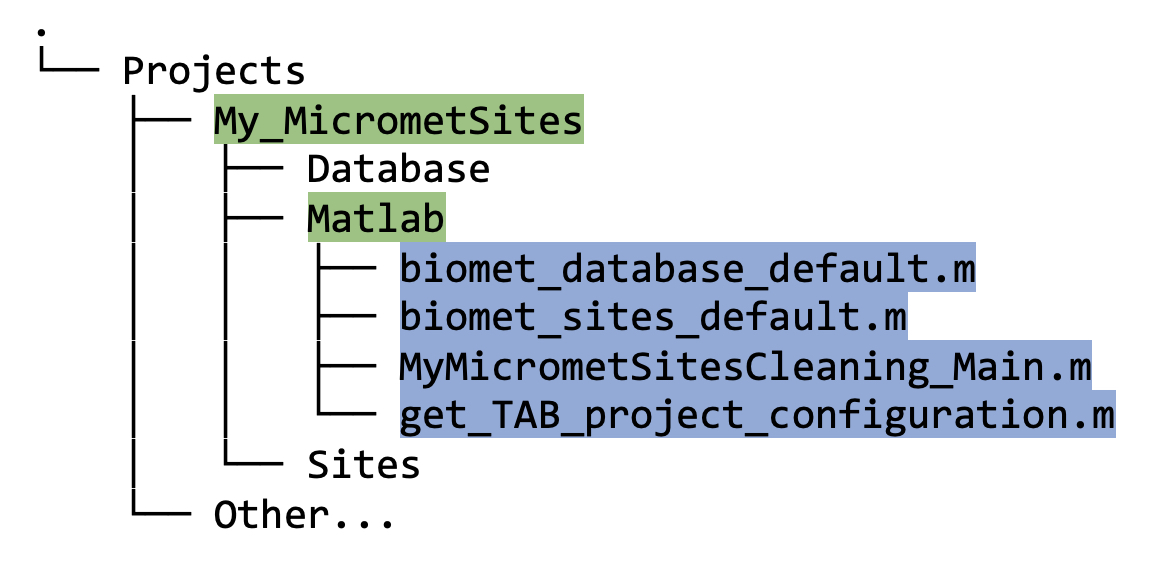
The two files not previously discussed, i.e., biomet_database_default.m and biomet_sites_default.m were automatically generated by set_TAB_project.m. If you run either of these on your command line in Matlab, you will see that it returns the full file path to either your Database or your Sites directory, respectively.